


The Radius VideoVision Studio is a very good tool for converting video from NTSC to RGB. This gives users a really good method of transferring movies from video to CD-ROM's and to the Internet. Many other systems do not have standard methods of modifying the NTSC signal so that it looks good on an RGB monitor. These other systems may capture movies that appear to have low contrast and saturation, which means that you have to go through an extra step of correcting the image. Offline image correction will take a long time, much longer than correcting during the capture (which is realtime).
The following is a list of hardware that we suggest for making movies for CD-ROM and online distribution:
The first step in making movies is to gather all of the footage that you want to capture, and log the 'in' and 'out' timecodes. If timecode isn't supported by your VTR, then you should just cue the tapes to where you want the in point to be.
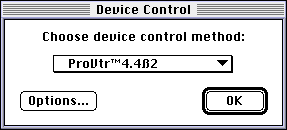
Next (if you are using device control), setup Premiere to control the VTR using the 'Device Control' preference in the file menu (under 'Preferences'). Select ProVTR (or whatever device control software you are planning on using). Make sure that the VTR is connected to your computer using a serial cable connected to the printer or modem port and the VTR. Click on the 'Options' button in the device control window.
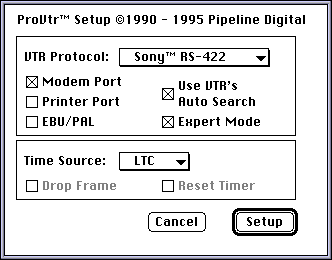
When the ProVTR Options window appears, select 'Sony(TM) RS-422' (if you are using a Sony Betacam SP) from the VTR Protocol window. Then select the serial port you are using, check the 'Use VTR's Auto Search' and 'Expert Mode,' and the Timecode track to use (LTC is suggested). Click 'Setup' when you are finished. Click 'Ok' in the device control window to save the changes.
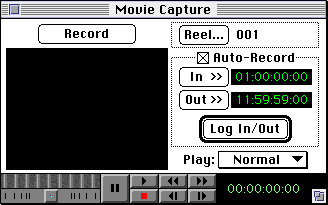
If everything went well, then you should now be able to control your VTR using your computer. You can test this by opening the video capture window (open 'Movie Capture' under 'Capture' in the file menu). If AppleTalk is active, then you will be asked to 'Deactivate AppleTalk'. We highly recommend that you deactivate AppleTalk since it may cause the computer to drop frames during capture. When the 'Movie Capture' window appears, try clicking on the play button, and if your VTR responded, then your VTR can be controlled with Premiere.
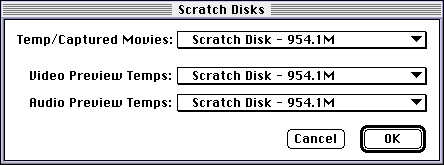
Go to the 'File' menu and select 'Scratch Disks' under 'Preferences.' Make sure that the 'Temp/Captured Movies' is pointing to your hard drive array. Click 'Ok' when you have selected your scratch disks. Next, you need to setup your video capture options. To do this, make sure you have the 'Movie Capture' window open, and select 'Recording Settings' from the 'Movie Capture' menu. See the graphic below to set your options:
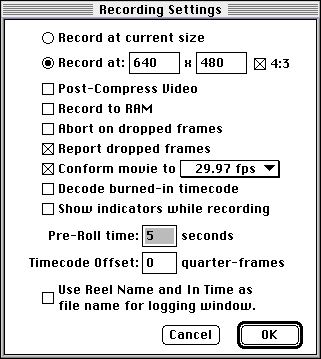
The preroll variable is the time that it takes to get the tape moving at normal play speed. Sony recommends that you only use the following preroll values: 3, 5, 7, 10, 15. When you are done setting up this dialog, click 'Ok.' Then, choose 'Video Input' from the 'Movie Capture' menu. See the next three graphics below to set your options:
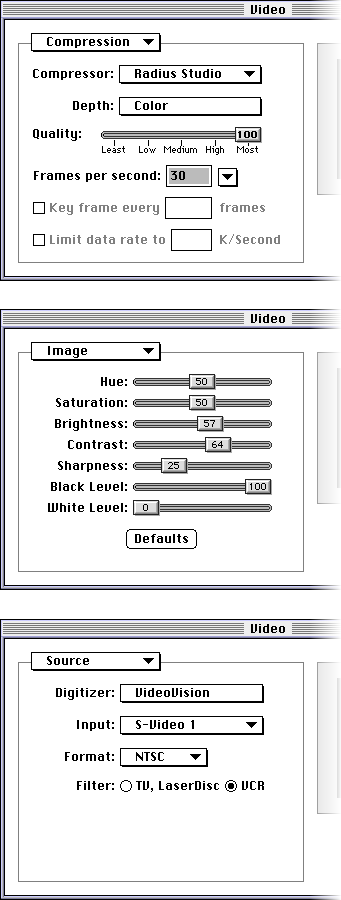
The last option in the video window is 'Studio.' You should click 'adaptive compression' and 'maintain data rate of:,' and then click on the 'Find' button to see what data rate your hard drive array can handle. Most array's can handle at least 3.5MB/sec. Any data rate below 1.5MB/sec will not have very good quality. You may need to come back to this dialog to change the data rate if your computer drops frames when you capture video.
If you plan on capturing sound, then setup your sound options by selecting 'Sound Input' from the 'Movie Capture' menu. See the next three graphics below to set your options:
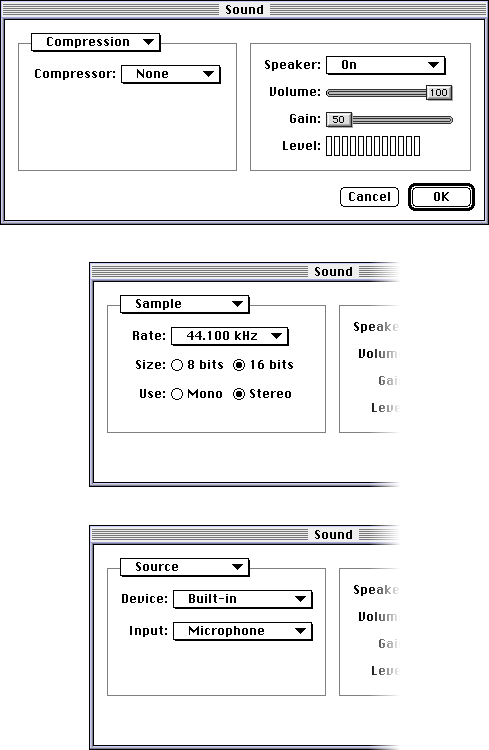
You will need an RCA-TO-MINI cable to connect your VTR to your computer's sound input port. You can find these at Radio Shack among other places.
The final step in the capture process is to actually capture the video. To do this, make sure that you have the 'Movie Capture' window open, select 'Auto-Record' and type your 'in' and 'out' timecodes. If you want to capture one clip at a time, click on the 'Record' button and record each clip individually.
To capture a batch of movies: click on the 'Log In/Out' button for each new clip, then when the 'File Name' dialog appears, type the file name, and the timecodes will be added to a batch list. After you have made a batch of movies, click on the 'Capture' button in the 'Batch List' window and the computer will capture all of the clips at once.
Video compression is not perfect, it is a means of getting video to low-end computers that can't handle high data rates. Most home computers with CD-ROM drives can barely handle 200-300kps compared to your high-end capture machine that can handle 3500k or more.
Compression for Online and Internet use is even more of a problem since most users have only a 2-3kps pipeline to download movies with, which means that it could take ten times realtime to download a movie. A 10 second clip could take two minutes or more. This results in small movies with low quality audio.
Since CD-ROM's and the Internet are not very high performance, you will need to compress your video. There are many types of video compression, the most widely used compressor is Cinepak. Cinepak has fairly good image quality, and takes much less time to decompress than other video compressors. Cinepak can play 320x240 15-30fps video on a Quadra 610 or 486DX-66. Other compressors, such as Intel's Indeo compressor can only play 12-15fps on the same computers. Cinepak is also cross-platform, and is provided with QuickTime for the Macintosh and QuickTime for Windows. In this documentation, we will assume that Cinepak is the best choice for CD-ROM and Online distribution.
The first step in compressing your captured movies is frame scaling. The 640x480 captured movies are too big to play well on a low-end machine. To scale the captured movies, you can use Cinepak Toolkit or Premiere (you could use DeBabelizer, but it would take much longer). We recommend that you use Cinepak Toolkit since it is faster than other programs.
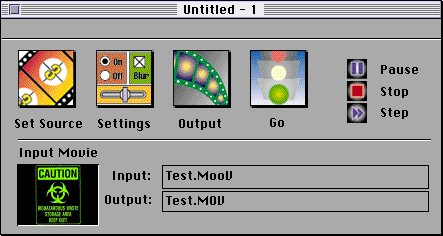
To start scaling your movies, open Cinepak Toolkit. Click on the 'Set Source' button and select the source movie that you want to scale. Then, click on the 'Settings' button. See the graphic below to set your options:
You may want to scale your movie to something other than 320x240, in which case you can change that in the settings dialog. There are a few things to keep in mind when you scale a movie: the first is that your movies dimensions must be divisible by 4 in both directions since Cinepak is a 4x4 block compressor, a example of a badly sized movie would be one that is 321x239; another thing to keep in mind is that if the video is too big, low end machines will not be able to play it without dropping frames.
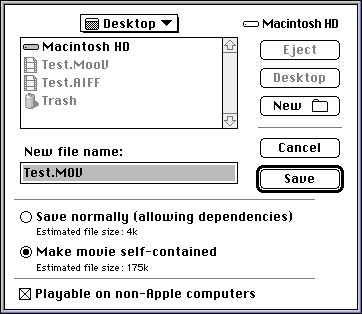
You will need to temporarily remove the sound track from your movie since Cinepak Toolkit and MovieShop do not work very well with audio. To extract the video track from your movie, open the movie in MoviePlayer and choose 'Extract Tracks' from the 'Edit' menu. Select the track you want to extract, and then click 'Extract.' Now, save the extracted track using 'Save As' in the 'File' menu. See the graphic below to set your options:
Now, you have to tell Cinepak Toolkit where you want to put the scaled movie. Click on the 'Output' button and point to the correct location. You may want to be able to see the scaled frames as they get scaled. To do this, select 'Show Resized' from the 'Window' menu. When you are ready to scale the movie, click 'Go.' The scaling process will take a long time.
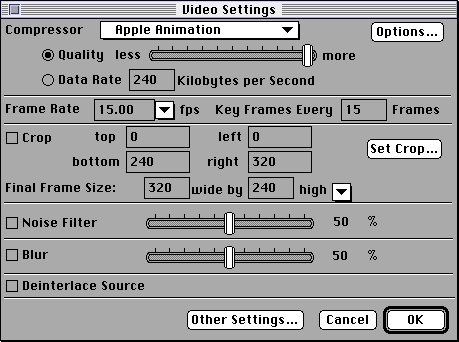
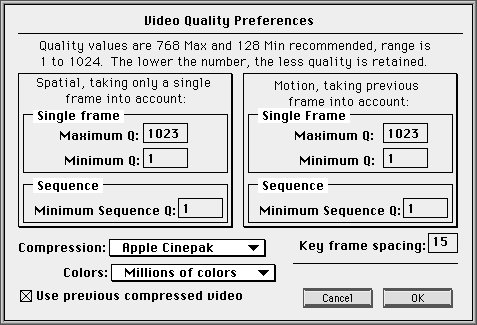
The last step in the compression process is to actually compress the movie. To do this, use MovieShop 1.1.4 or 1.2.1. Open MovieShop and click on the 'Import' button and point to the file that you want to compress. Then, choose 'Video Settings' from the 'Preferences' menu. See the graphic below to set your options:
Now, you need to select your compression methods. To do this, select 'Methods and data rate' from the 'Preferences' menu. See the graphic below to set your options:
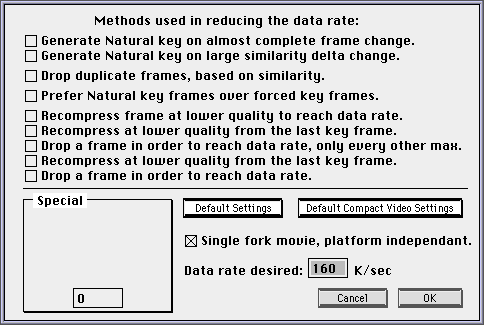
The data rate you select here will effect the file size of the compressed movie. For Online distribution, you should make your movie at 40-60kps. For CD-ROM, we suggest that you keep below 200kps.
Finally, click 'Make the movie' and choose a location the place the new movie. MovieShop will now compress the movie. It should take less than 3 seconds per frame to compress the movie on a Power Macintosh 8100.
To re-interleave the sound with the compressed movie, open the original captured movie in MoviePlayer and select 'Extract Tracks' from the 'Edit' menu. Choose the Sound Track and click on the 'Extract' button.
To compress the sound track using IMA 1:4 sound compression, select 'Export' from the file menu. Select 'Sound to AIFF,' and click on the 'Options' button. Select 'IMA 4:1' as the sound compressor; if you don't need high quality audio, select '22.050' from as the audio quality; and if you don't need stereo, select 'Mono.' Click 'Ok' and save the sound. Then open the compressed sound in MoviePlayer.
Now you have to copy the sound information to the compressed movie. To do this, open the compressed movie and the sound. Make sure that the sound is the frontmost window, and select 'Select All' from the 'Edit' menu. Then select 'Copy' from the 'Edit' menu, and click on the compressed movie's window. Now, hold down the option key while selecting 'Add' from the 'Edit' menu.
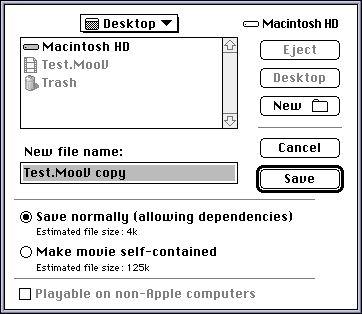
You should now save your compressed movie with the added sound track. See the graphic below to set your options:
You now have a compressed movie ready to distribute on a CD-ROM or Online!

