Home

Rentals

Sales

Computers

Consulting

What's New

Press Releases

Road Map

Email

 
mfi_head_ph.gif (13126 bytes)
 
mfi_dev.gif (2646 bytes)


Da-Lite  
[Product Information]
[Home Theater]
[Educational Materials]
[What's Hot]
[The Power In Presentation Products]

 
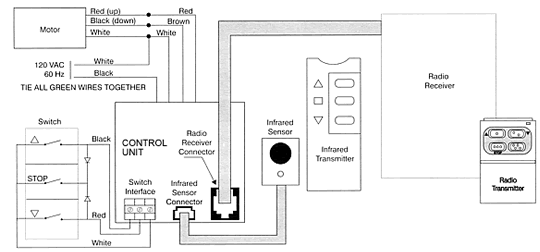
Single Motor Low Voltage Control Recommended Installation and Wiring Instructions


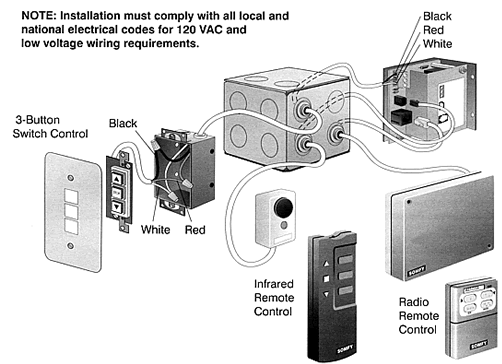
LOW VOLTAGE WIRING INSTRUCTIONS


Switch Control Wiring


  • Mount the 3-button switch(es) in a standard gang box at the desired location(s).
  • Run three low voltage wires to the 2 gang box from each 3-button switch, and connect the black, red and white wires to the switch interface terminal as indicated in the drawing above.


OPTIONS


Radio Remote Control Connection


  • Securely attach the radio receiver adjacent to the controller.
  • Attach the plug from the receiver into the telephone jack on the control board as indicated in the drawing above.
  • If it is necessary to change the transmitter and receiver code, please call the Da-Lite Customer Service Department at 1-800-622-3737 or 219-267-8101 for instructions.


Infrared Remote Control Connection


  • Securely attach the IR sensor at a location close to the screen, but visible from where the transmitter will be operated.
  • Attach the plug from the sensor into the connector on the control unit as indicated in the drawing above.


Auxiliary Control Connection


  • Run wires to the Low Voltage Control from the Auxiliary Control location and connect the black, red and white wires to the switch interface terminal as indicated in the wiring diagram above.
  • A closure of 0.5 seconds between the Black and White terminals moves the screen Up.
  • A closure of 0.5 seconds between the Red and White terminals moves the screen Down.
  • A simultaneous closer of 0.5 seconds between Up, Down, and Common will STOP the screen in its current position.


LINE VOLTAGE WIRING INSTRUCTIONS
WIRING STEPS


  1. Connect the motor cable to the Single Motor Low Voltage Control per the wiring chart below.
  2. Connect the power source to the control box, and then apply power.
  3. Mount sectional cover plate to two gang box, using screws supplied.
  4. Test projection screen for proper operation by cycling UP, STOP, and DOWN from each 3-button switch, IR transmitter, or radio transmitter.

 
WIRING COLOR CODE
MOTOR
CONTROL
SOURCE
 
BLACK
BLACK
WHITE
WHITE
WHITE
GREEN
GREEN
GREEN
RED
RED
 
BROWN
BROWN


NOTE: A 5 Amp, 125 VAC fuse protects the controller in case of a wiring problem. This standard fuse can be found in any electrical supply store.

CAUTION GROUNDING CONTINUITY: If metallic conduit is not used throughout the screen and control installation, grounding conductors are required to provide a ground continuity between the screen and the control unit.


ELECTRICAL WIRING DIAGRAM


  1. Securely attach Da-Lite receiver adjacent to the Control. Infrared receiver must be in line of sight to transmitter to operate screen.
  2. Attach plug from receiver into jack on Control board as indicated in the drawing above.
  3. Test the projection screen for proper operation UP, STOP, and DOWN from each 3-button switch, IR or radio transmitter.


NOTE: The information contained herein is believed to be accurate and reliable as of the publication date, June 97. Please consult Da-Lite to ensure that you have the most up to date product specifications. Da-Lite reserves the right to update, change or improve this product without prior notice.


For pricing information, please contact Media Fabricators, Inc.
via e-mail at [email protected] or via telephone at 323 937 3344.


Home . Rentals . Sales . Computers . Consulting
What's New . Press Releases . Road Map . Email
 
Copyright© 1999, Media Fabricators, Inc.  Send comments to: [email protected]
Press Releases